
A lot of our customers here at Underlay4u regularly ask for our advice on how to fit their own underlay in order to save a bit of the costs and time associated with DIY projects, and do things on their own schedule. We get it – life is busy these days. DIY jobs need to get done when they get done, and not at a time that will disrupt the rest of your life.
Wouldn’t it be great if instead of having to be at home to let the carpet fitters in, or arrange for a relative to drop round in the middle of the day with the spare keys to open up, you could just do it in the evening after work, or on Sunday when the kids are at football?
In this post we’d like to go through the steps you can take in order to fit your own underlay quickly and easily, and also how to make the most of the process in doing up your home. Actually laying the underlay is quite an easy task once you have everything else in order, but it helps to take the time minutes to plan and prepare properly. So let’s get to it:
Make a Plan – Room by Room
Whether you are just changing flooring or carpets or are completely overhauling the interior of your house, it is best to do things one room at a time. Firstly decide what you want to do (and what you realistically can achieve) in each room, and then think about how the different tasks tie together.
For example, it is much easier to paint an empty room than having to cover and move around the furniture – so if you need to clear the room in order to change the carpet, but also intend to re-paint the ceiling one day, why not combine the two jobs?
Also, if you are changing the flooring (and are disposing of the old stuff) then it makes sense to paint before pulling it up – the splashes won’t matter, and you won’t risk damaging the boards or other materials that are underneath the flooring with a ladder. But also remember that it is easier to paint the lower parts of skirting boards once the floor has been removed in most cases, particularly if this is carpet.
Once you know exactly what to get done in each room, the next job is to decide on what order to go through them. Be sensible with this – if you are doing extensive DIY then don’t do all of your bedrooms at the same time; otherwise where will you sleep? Also consider exactly how long your bathrooms and kitchen might be out of action, and balance things out so the projects aren’t too disruptive.
Note that the timing of stairs is particularly tricky as you likely use them everyday, so they can’t be out of action for too long.
Now you have a clear plan about what to do, and assuming any painting or other decorating or repairs are done, it is time to empty the first room so you can remove the flooring.
Emptying the Room
When you’re ready to get working on a room, here’s the first problem to solve; where does the furniture go?
You can move out smaller items into other rooms temporarily (but make sure they don’t block access to anything you will need) or into storage, such as garages and attics. It is easier to move cupboards and units that are empty of course, and make sure you take out any drawers, shelves, rails or boards to make the item lighter.
However, bigger items can’t always fit through doors or windows if they were assembled within the room. If this is the case you really have two choices:
1) take the furniture apart, or
2) move it to one side of the room, sort the underlay and carpet on the other side, and then move the furniture onto the new flooring in order to complete the room.
The choice will be yours depending on the piece that needs to be moved and the dimensions of your room. Once the room is clear, the next job is to get rid of the old flooring.
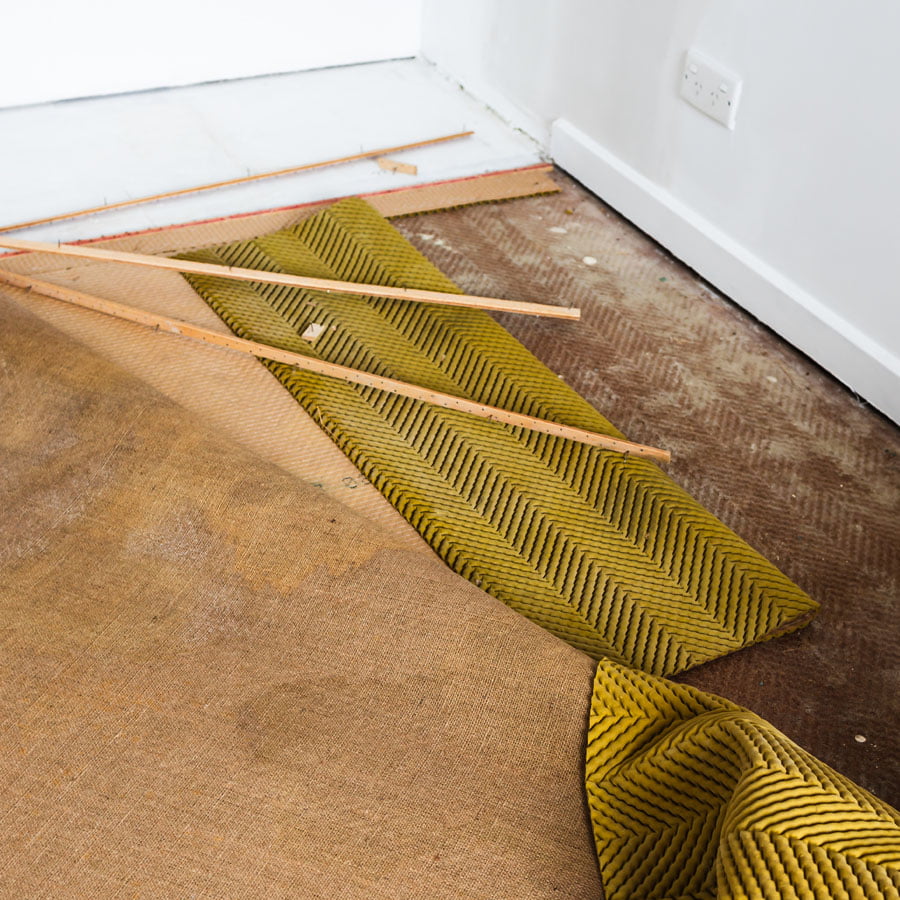
Cut the carpet and underlay into strips
If you’re not planning to re-use your old carpet, the best way is to cut into strips width ways. Then you can roll each section up and carry it out of the house with ease.
Different carpets will have different backing. Some are simply rubber that cut with ease. However, some are woven fabric. For these you will need a much sharper knife to get through it.
Here’s a video that shows you exactly how to cut your carpet into strips
You are currently viewing a placeholder content from Default. To access the actual content, click the button below. Please note that doing so will share data with third-party providers.
Removing and Disposing of Old Flooring
It helps to be clear how you will go about disposing of old carpets or floorboards before you rip them up throughout the house. There are a few different options depending on what you prefer.
Can the local council take your old carpet?
Firstly there is just getting rid of it all. Waste disposal and recycling differs around the country depending on what your local council prefers, so first check the website or give them a call to find out what the best option is for you.
If they can collect the materials that will be easiest – but if you need to take them to a tip or recycling centre then make sure you cut them to a size that can be transported using your vehicle.
Do any local companies want it?
Secondly, there might be businesses or organisations in your area that will take the old carpet and, possibly, the old carpet underlay off your hands as they can reuse or recycle it. A quick search online for terms like ‘carpet disposal in [your town]’ might point you to some good options.
Thirdly there is an option to simply reuse either the carpet, underlay (or both) in your loft, utility room, garage, shed or elsewhere in the house if they aren’t in too poor a condition. Again, make sure you cut it to the right size and give it a clean too.
Also consider where you are going to store the materials until you get rid of them. Remember that they will be the area of the floor, so may take up a lot of space, and you don’t want them to be delaying the rest of your work.
Checking the Ground
Once the flooring has been removed and the area underneath exposed, this is a good time to do a few quick checks on the integrity of your floors. So have a look around for any areas of damp or damage that need addressing.
See if there are any gaps and look at the integrity of boards and other flooring. Also look at where they fix to the walls, particularly upstairs, to check everything is safe and secure.
If you have exposed any water pipes, telephone cables or electrical wiring (this is unlikely, but there might be some showing along the edges of your rooms) it is a good idea to make a note of those you weren’t aware of. That way, you can make sure that not to put a nail through any of them at a later date!
Finally, check along the edges for any issues with the skirting in case something needs doing there too – maybe there are some rough wallpaper edges hanging out of the bottom that you can remove, or perhaps some jagged bits of the skirting itself that can be sanded down for a nicer finish.
Clean it All Up – Even the Doors!
Once your happy with the state of your floors and don’t think there is anything there that needs checking then all that is left before laying the underlay is to give them a good clean. When you do, also check for any screws, tacks or nails along the edges, as it is common for them to roll into nooks and crannies only to rust there for the next 10 years!
Before you get the hoover out however you might want to remove the doors to the rooms to make it easier to work. This isn’t absolutely necessary, but if you have the time and tools needed (and are comfortable with the work) then we’d recommend removing them if possible.
Now everything is checked and clean, it is time to fit your underlay and flooring. The first thing to fit is the gripper.
Fitting Carpet Grippers
Carpet grippers help ensure that carpets are secured and look well-finished once laid. Carpet grippers are strips of plywood with small protruding nails that are angled to fix to the bottom of the carpet surface.
Grippers need to be fitted before underlay is placed on the floor. Take the time to ensure they are straight and level, as this will make your carpet more secure and even.
Carpet grippers should be fixed around the edge of the room (with the exception of doorways) with a gap of around one and a half times the thickness of the carpet between the gripper and the wall or skirting board. They usually have an angled edge on one side, and this should be placed nearest to the wall.
You can usually nail the grippers to the floor, or simply glue them if the floor is concrete. Once they are affixed and secure, you next to need to lay out the underlay to fit the floor.
Laying Out and Cutting
Underlay is provided in rolls with a variety of lengths, so be sure to measure the area of the exact space you need to cover – which is all of the space between the carpet grippers. You will also need a few extra centimetres along the edges sticking out over the carpet gripper as this makes it easier to fix the underlay securely, as discussed in the next step.
If you are using lining paper then this should be laid first. It can be easily stapled or glued down once cut to fit.
Lay out the underlay needed on the floor, rubber side down, and cut it to fit. As mentioned, leave a few centimetres over the carpet grippers, and do not overlap sheets or you will end up with lumps in the floor. If needed you can use carpet tape to join sheets together. A sharp cutting tool (and a bit of patience!) is vital to getting accurate sheets of underlay ready to fix.
The Grand Finale – Fixing the Underlay to the Floor
With a thicker product, remember to ensure that your door can open and close safely over the carpet and underlay. You’ll need to ensure that there is enough space between the door and carpet so that the door does not rub and damage your carpet.
With the floor surface fully prepared and the underlay cut and laid to fit, all that is left is to fix it firmly in place. Ensure you take your time with this part of the process and try and get it right first time – a smooth and secure underlay will help your carpets look and feel better, as well as help them last longer by giving added protection.
Firstly, fix the underlay edges flush to the inside of the grippers. If your floor material is wood then heavy staples can be used, or if it is concrete then simply apply glue or tape.
Next, ensure that the joins between sheets are straight and secure. Use tape to fix them in place where needed, if you haven’t already done so.
Finally, use a sharp knife or scissors to trim off the excess underlay over the grippers, and around any doorframes or other fixtures in the room.
And there we have it! Your underlay has been carefully measured, cut and fitted to a perfectly prepared floor for the next room in your DIY masterplan – congratulations! You can now be confident in laying your carpet or laminate flooring as you have created a great surface beneath it that will enhance the look and feel.
If you have any questions about underlay or flooring DIY projects then we’ll do our best to help you at Underlay4U. Feel free to reply to this email or contact us today and we will get back to you as soon as we can.