

Laminate floor boards are a great and simple option for your new flooring because they are easily accessible and can be fitted yourself – only after you have read this article of course.
Laminate can also be hard wearing because it has a strong surface. That makes it very scratch resistant and in turn an extremely popular choice.
These are some general guidelines to fitting a laminate floor. Always remember to follow the manufacturer’s instructions and, if in any doubt, use a professional installer.
Types of underlay vs type of floor
Different flooring requires different underlays.
The best option is to remove all floor coverings that are currently in the room where you want to lay your laminate. Also note that you can’t lay it on carpet or on top of vinyl.
Choosing your underlay is also an important option because the Underlay needed will depend on type of room and your preferences in terms of warmth, sound reduction and therefore your budget too.
Read our article to find out more about the type of underlay you need: What is the best underlay for laminate flooring or engineered wood floor?
Now let’s look at what you need to do to ensure your new flooring fits well and even stands the test of time.
Step 1 – Prepare for your installation
Measure Your Rooms
Once you have worked out the area you should add 10% to cover waste. If your laminate comes in packs, divide the area by the coverage of each pack and then round up to get the number of packs you need.
Get Your Fitting Materials and Tools
Before you start the job, make sure you have everything you need to do the work. This includes:
- pulling bar
- spirit level
- scissors or knife
- ruler
- try square
- saw (hardpoint handsaw, or jigsaw with laminate blade, or circular saw)
- knee pads
- safety goggles
- dust mask
- fitting wedges or spacers
- trim cutters Materials
- damp proof membrane (if it is not part of the underlay)
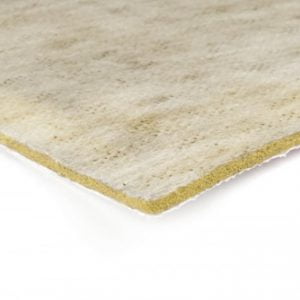
- underlay
- laminate flooring
- masking tape
- threshold strips and laminate trim
- trim adhesive
Prepare the Sub-Floor Surface
As mentioned it is vital to make sure the surface to be laminated is completely flat. If it is not level by even a small amount then you will end up with creaking floorboards that are very hard to fix.
Use the spirit level to check all areas of the floor, level it using appropriate materials such as a levelling screed, and ensure it is free of any small bits, pieces or lumps. Some small bumps and rough patches on a concrete base floor are expected, but if you have any serious issues with the floor’s level then it is best to fix this before adding underlay, laminate or any other kind of flooring.
Before being able to lay the laminate flooring itself, you first you need to make sure that your surface is ready.
This involves deciding which rooms will have the flooring updated first, depending on your DIY schedule and other plans, and then clearing the rooms.
As you go, ensure you know exactly how to deal with corners, skirting, doorways, pillars, beams and any other obstructions or features that will affect the floor plan.
You’ll also need to factor in removing and disposing of old laminate floor and underlay so that you have a surface ready and waiting to be worked with.
This surface needs to be as clean and dry as possible for the laminate underlay and flooring to work effectively.
Acclimatise the laminate panels
One of the most important steps in the process, and one that many people overlook, is the need to prepare the floor materials before laying.
Once your new laminate panels have been delivered, they need to acclimatise to the temperature and moisture levels of the room in which they will be laid before being fitted.
To do this, simply stack the material, opening any sealed packaging, in the room where the laminate will be used and leave it there for a few days (the number should be specified by the manufacturer).
You might be wondering ‘will laminate flooring increase home value?’ Well, if it is not fitted well because the acclimatisation stage has been skipped, then there is a reasonable chance that it won’t!
Once the acclimatisation is complete and now that the surface and the flooring are prepared and ready, the next step is to check for damp, then install underlay and then the panels.
Step 2 – Check for damp
If you have read our article about choosing your laminate underlay, you will know that, whether damp exists or not, is a key driver of your purchasing decision.
Here’s exactly how to check for damp.
Purchase half a metre square of polythene sheeting. Tape the polythene sheet to the floor, making sure there are no gaps.
Leave it to sit on the concrete overnight and check back the next morning.
When you check back, if you find there’s moisture underneath, then you have got moisture on the floor and you do need to use a damp proof membrane (dpm).
Our underlays have a dpm built-in so they will protect your floor from moisture – remember that the dpm goes underneath the underlay against the subfloor.
In circumstances where you are unsure, always use a dpm because having one built into the underlay will never do harm to any subfloor.
Step 3 – Installing underlay for laminate flooring
All flooring installations should use an appropriate underlay. Over a concrete subfloor you will need to use an underlay which has a built in damp proof membrane, like Barrier Plus Laminate Underlay with built in DPM.
Laminate flooring is not as hard under foot as a concrete, stone or marble surface but it also isn’t as soft as carpet.
A good underlay will help to absorb ongoing shocks and feel far more comfortable, particularly when you aren’t wearing shoes.
It will also extend the life of the floor by mitigating and spreading impact and helps to insulate the floor better, particularly around the edges and any features or gaps.
It is highly recommended that a good quality underlay is used with laminate flooring as the thickness of the panels is usually low.
It is also important to select the right model for the type of surface. For example, floors with underfloor heating will need a certain model of underlay that will enable the system to operate effectively.
For installations over underfloor heating the best option is to use Duralay Heatflow Wood & Laminate underlay . Measure out how much you need and make sure you’ve selected the right type.
Alternatively, downstairs floors that are particularly cold and/or have a base made of concrete usually need underlay with a damp-proof membrane to keep the flooring dry and avoid the risk of warping.
Once you have made your choice, fitting underlay below laminate flooring is straightforward if you have the right tools and a surface that is well-prepared. Simply measure and cut the underlay accurately and then fix it to the surface (the method will depend on the surface and underlay), shaping to fit.
With the underlay successfully added all that is left is to fit the laminate flooring itself which, thanks to overlapping boards and click-in panels is probably the simplest part of the process!
You should make sure that the underlay extends up the wall by at least 5 cm. Make sure everything is dry, clean and smooth.
On concrete, lay the underlay with the vapour barrier side down and tape the seams of the underlay on the top side with vapour tape.
On wooden and other types of floor lay the underlay with the rubber side down, and again tape the seams with an appropriate underlay tape.
When fitting the underlay leave a 5-10mm gap around pipes.
-

-
Timbertech Laminate Underlay 3mm
- Price range: £3.34 through £332.91
- Select options This product has multiple variants. The options may be chosen on the product page
-
-
-
Duralay Heatflow Laminate Underlay
- Price range: £16.57 through £1,655.44
- Select options This product has multiple variants. The options may be chosen on the product page
-
-

 SALE
SALE-
Super Gold 5mm Laminate Underlay
- Price range: £4.33 through £432.25
- Select options This product has multiple variants. The options may be chosen on the product page
-
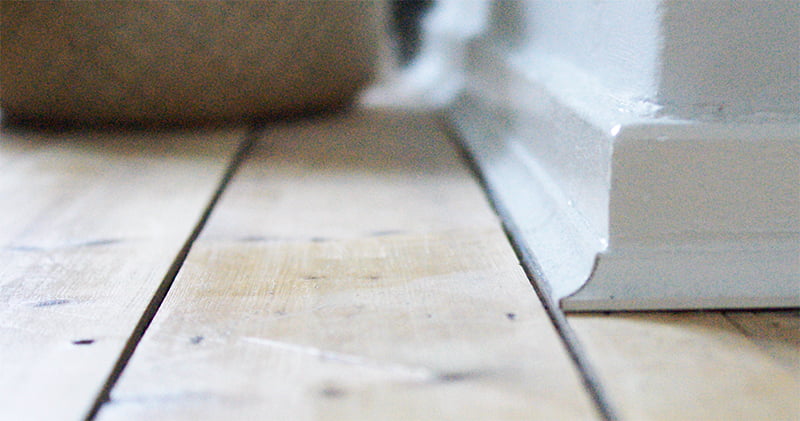
Step 4 – Prepare the Laminate Flooring Expansion gaps
You may have heard about expansion gaps. These are absolutely crucial when fitting your floorboards.
What is an expansion gap?
It’s a gap of approximately 10mm. which is needed all the way around the edge of the room.
The reason it’s necessary is because you are fitting a floating floor. That means it will move, expand and contract based on the climatisation of the room it’s laid in.
What’s more, without the gap, the floor will still move, but instead of filling the gaps on the outside of the room, it will raise itself in the middle of the room.
Meaning the boards will rise against each other, which wouldn’t look good at all and it certainly wouldn’t feel good underfoot. In worst case scenario, you may need to replace the whole floor if there are no expansion gaps.
Here’s how to create expansion gaps…
To ensure the expansion gap remains the same all around the room, simply cut a piece of wood that is 10mm thick to use as wedges.
As a little hack you could make wedges out of unused skirting board if you have any.
The quality doesn’t matter as much as a consistent thickness does, because you will be removing the wedges once you’ve finished. Probably never to be used again.
Place the wedges around the outside of the room, using approximately 4-5 wedges for every 3 metres on each side of the room should work well.
Now you’ve prepared the sub floor, it’s time to explain how to lay the floorboards.
Step 5 – Lay the Laminate floorboards
Each laminated board has a profile around its edges.
Two of the edges on each board are bigger and stick out (known as the tongue edge) – these need to face towards you as you lay the flooring.
The smaller profile edges have a groove. Known as the groove sides. They need to face away from you as you lay the floor.
It’s best to start at the left-hand side of the room, working your way across the wall, which is on the longest side of the room.
So, take your first board and push it up against the expansion wedges. Remember, the grooved edge goes against the wall and the tongue edge faces you. Make sure it is square with the wall, and with the short tongue against the wall.
Once the first board is laid, put the next board to the right of it – make sure you go along the room in rows (not columns),
Slot the tongue side of the second laminate board into the first groove of the first one. Again, making sure the groove is facing away from you. Make sure the second board is perfectly aligned with the first one, otherwise the join will be messed up.
Quick tip – place a spacer where the two boards join, this will help to make sure your first row is straight. Keep going to the end of the wall on the right.
When you get to the other end of the room, it’s highly likely that the last piece will be too big to fit in.
So, you will need to cut the board.
The best way to cut it is by using a jigsaw or a fine tooth saw. The reason you need a fine tooth saw is because it will give a smooth finish to the board
If you’re using a jigsaw, you should use a laminate blade so that you don’t split the top of the laminate.
Make sure there is a spacer between the last board and the wall, and then draw a line across the last board level with the end of the previous board. Cut across this line, turn the board round, and click into place
Moving on to the second row
If you have between a third and two thirds of a board length left then it can be used to start the next row; otherwise, cut a board in half. To start the next row, put the cut end against the left hand wall (with a spacing wedge, of course) and angle the long edge of the board into the row that is already down. Press forward and fold down at the same time to click it into place
When deciding whether to cut a new piece to start the next row, the golden rule is – make sure the off cut is more than 50cm long – any shorter than that and it’s best to start with a brand-new board. Just make sure the joins from the first row don’t line up with any joins on the second row.
When slotting the next board into the previously laid row, simply hold the new board at a 45 degree angle then position the groove into the tongue.
Then, continue across the room fitting the boards together as you go.
In most rooms, you will need a partner to help you fit the subsequent adjoining rows. That’s because as you move along the subsequent row, you will need to lift the whole row up to 45 degrees angle, to slot the boards into the previously fitted row.
Make sure everything is slotted together nicely before moving onto the next row of boards.
Repeat this process until you have filled the room.
For the final row, you might need to cut the boards length ways to make them fit. To cut the final row to size, place the board to be cut exactly on top of the last full row and draw a pencil line at the point which needs cutting.
Now for the finishing touches
Step 6- Laying Down Scotia Beading
Many rooms use beading to hide any gaps between the boards and the walls. You’re not restricted to beading though, you could put skirting board over it instead.
To stick the beading down you will need either adhesive glue or a panel pin nail gun – Note, never stick the beading to the laminate floor because you want the floor to freely expand during the summer and winter months – only ever stick beading to the skirting board or wall.
Cut the beading to the length of the room’s walls, when you get to the corners, use a mitre box to cut at a 45-degree angle.
That way, each joined piece of beading will fit together nicely.
Step 7 – Add Finishing touches and maintain
You can add parts to the flooring to tidy up. For example a cover hole for the radiator piping that comes through the floors.
You will also need to use door thresholds – there are a few different types depending on whether you are joining laminate-to-laminate or carpet-to-laminate at the doorways.
Simply cut the door threshold to the right size and then fit it between the rooms at the doorway.
It’s a good idea to invest in a cleaning kit for your laminate floor as it’s the best way to maintain it, to make it last as long as possible.

Frequently Asked Questions about laminate floorboards
What are the benefits of the click method laminate flooring design
The method we have explained above is known as the tongue and groove method for reasons which hopefully you now understand.
However, there is another method called the click method.
With the click method, you will start in the same part of the room and still work across the room in rows (long ways). However, you don’t need 2 people to fit the floor. That’s because you don’t need to lift the whole row every time. Each board simply slots freely into the other board.
How much does laminate flooring cost?
Metre for metre laminate flooring is one of the most cost-effective flooring options. It is simple to clean, durable, and is available in various different effects to suit your style.
But as a synthetic material one common question we’re asked is; does laminate flooring add value to a home?
This is a tricky question – it is a very cost-efficient flooring material, so if it is used to replace a more expensive flooring material such as mahogany boards or marble, then this could effectively be a reduction in value of the room.
However, this doesn’t take into account the age, state and aesthetics of the flooring being replaced.
Marble may be much more expensive than laminate, but if the marble floor in a bright and airy new kitchen is cracked, dark and suffering from signs of age, the new laminate could help add value to the home.
The cost of a laminate floor depends on several additional characteristics such as:
- Quality – including the brand and performance characteristics.
- Thickness – most laminate flooring is relatively thin but there is some variation.
- Preparation and fitting requirements – if you have a difficult floor to cover, the cost of preparing it should be considered, and
- Underlay – a good underlay is usually needed for laminate flooring (more on this below) which can also add costs.
However, by far the biggest driver of the price is the area of floor that needs to be covered – and for this you need to measure accurately.
A final word
When choosing, preparing for and fitting laminate flooring, take your time and work logically, end-to-end across the room, ensuring each board and section are flat and secure before moving on.
You’ll soon have a fresh-looking floor that is ready to use and will make the room look and feel great. It may even add value to the overall price of your home.
Good luck!