
If you’re in the middle of a home renovation and you’re looking for a relatively cheap flooring option that’s easy to lay. Sheet vinyl might just be the best option for you. It’s durable so it can stand the test of time but it does need to be laid correctly.
So, in this post we’re going to walk you through step-by-step on how to fit a new sheet vinyl flooring in your home. It includes how to get round obstacles, how to finish it off really neatly and even how to protect it in a bathroom or kitchen fro the inevitable splashing of water. Perhaps more importantly, we also give you a list of kit you’ll need s you can get your shopping list started straight away.
Health and safety precautions when laying sheet vinyl
- Always wear protective clothing
- Be very cautious when using a sharp knife not to cut yourself or any other furniture
- Always read the manufacturers instructions
Equipment Needed
- Protective knee pads
- Hammer and nail punch
- Utility knife with sharp blade Make sure it retracts
- Tape measure
- Vinyl cutter (for a clean cut on long straight edges)
- Double sided tape
- Spray adhesive
- Beading or flooring trim
- Sealant (white or clear)
- door trims or threshold
Preparing the sub floor
- Sweep the floor thoroughly
- If the sub floor has been treated, check if it’s still suitable of recovering with sheet vinyl
- Remove all nails or screw heads fro the sub floor. Get rid of any dust or small stones too
- Even the smallest bits will show through because sheet vinyl is very thin
- Tip: punch nail heads below the surface rather than trying to take them out completely
- Clean the sub floor to remove any oil or other protective layer
- Make sure any concrete floor is free from damp and likely to remain free from damp for the future
- If you do find damp, you should definitely rectify it before laying your sheet vinyl
- Level the floor first if it’s uneven to achieve a much better finish
- See post on how to level concrete floor
Measuring the room for sheet vinyl
You will likely only need one sheet of vinyl for most standard sized rooms, making it easier to lay. Be sure to avoid making any joins to the flooring in rooms where water is going to be splashed on it.
Work out the full area of the room by measuring the lengths and widths of all sides. Good idea to measure in sections if it’s not exactly square or has an L-shape to it. Be sure to include any alcoves.
Add 90mm to all measurements so you can have a bigger cut-size of the sheet vinyl than the room. That way it won’t be any smaller than the room. Like with underlay, A cut too-small is much harder to fix than a cut too big. Even more so with sheet vinyl because it’s the top floor and won’t be covered
Positioning the Sheet vinyl in the room
- Unroll it inside the room where the material will be laid.
- Leave it for 1-2 days to acclimatise
- If you’ve installed underfloor heating, this needs to be turned off at least 24 hours before positioning the vinyl floor
- Roughly position the sheet in the room. Make sure you have the extra 90mm overlapping the edges of the room
- Any obstacles, for example sinks, toilets or fire places, you’ll simply cut the material to go around it nice and snug, here’s how:
- Cut down the vinyl along the front edge of the obstacle
- Then lay each cut gradually along the obstacle cutting it as you go.
- Lay the material around the back of the obstacle
- Trim any excess material off so it fits snugly around the obstacle
- Remember when cutting the sheet around the sink, not to cut yourself.
- After working around the obstacles, you’ll then want to work your way around the whole room and trim each edge as you go. Use a vinyl cutter for any long straight cuts so you can make sure they will be flush against the wall. That way you’re much more likely to have a nice, clean and completed edge
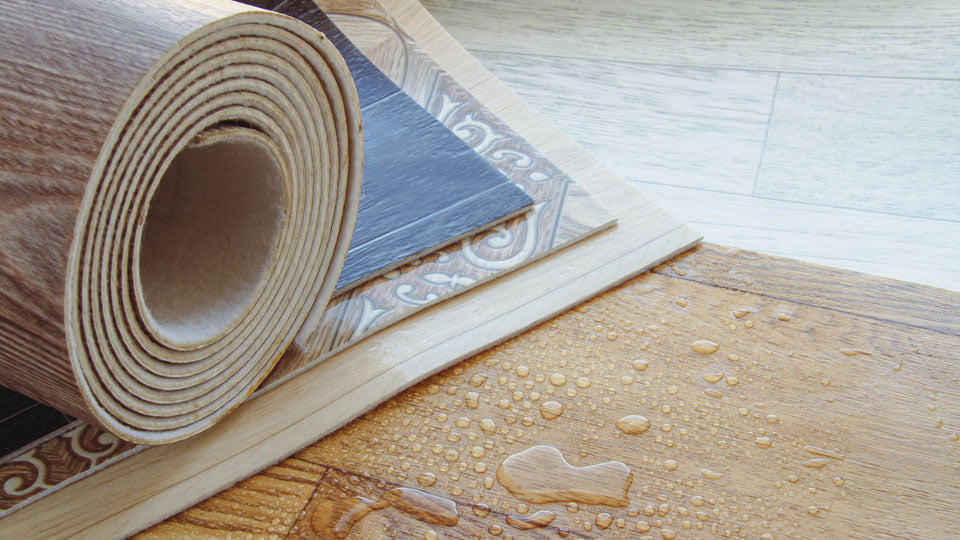
Avoid making any joins in rooms where there’s likely to be water splashed around. Mainly because water could get underneath the vinyl and ruin the whole floor by damaging the vinyl material.
Adhering the sheet vinyl to the sub floor
All sheet vinyls need to be bonded agains the sub floor. Most of the time it’s done using an appropriate vinyl flooring adhesive across the whole areas. Some others only need to be stuck around the edge of the room and may be done using double sided flooring tape. Usually that’s cushioned sheet vinyl. Always read the labels and instructions about how the material should be connected to the sub floor. Specifically whether it should be stuck right across or only at the edge of the sub floor.
Using double sided tape
- Use a spray adhesive in the areas of the sub floor, which you’re going to attach the double sided tape (always read the manufacturers instructions. This will significantly improve the surface area for the tape to stick better.
- Be careful not to spray the adhesive onto the walls
- First stick down the tape onto the adhesive without removing the backing paper
- Use something like a length of timber to smooth out any creases by running it along the top of the tape that you just stuck to the floor.
- Make sure the tape is firmly fixed to the floor.
- When you reach the corners, trim the tape with a sharp Stanley blade.
- Remember to put some tape around the base of any obstacles such as a sink leg or toilet etc.
Fitting the sheet to the tape
- Work your way around the room lifting the sheet that you placed on the floor
- Remove the backing sheet from the double-sided tape
- Push the edge of the vinyl down securely onto the tape
- Rub your fingers firmly along the edge of the flooring to make sure it’s securely in position
Protecting and finishing the floor in a kitchen or bathroom
Option 1 – Apply sealant
If you’er fixing the sheet vinyl in an area where there’s likely to be splashing of water, you can apply some waterproof sealant. You’ll want to cut the nozzle at an angle and make it a similar size to the gap you’re trying to fill.
To smooth off the sealant, use either a shaper or a wet finger with a little bit of soap.
Option 2 Fit a floor trim (aka beading)
Another option for finishing or protecting the floor is to fit some beading around the outside edge
Finally, fit a neat door trim in the doorway to create a neat finish between rooms
How to test for dampness on concrete floor
- Put a square cutting of polythene on the floor and tape it down along all edges using tape
- leave it overnight
- Any moisture showing under the polythene means it’s damp
And then…
Your work here is done. A beautiful shiny sheet vinyl floor fit by your very own hands.