
This post tells you everything you need to know about carpet grippers.
There’s 2 sections. You can navigate the page easily. Just click the links below to read more and find the answers to your questions.
Section 1. What are gripper rods? Do I need them? Where to buy?
Section 2. How to fit carpet grippers
If you’ve chosen to go down the DIY route, make sure you read this article in full. It will help ensure your project is a success. It will also help you minimise mistakes and keep frustrations to a minimum.
An introduction to Carpet Grippers
This section addresses the most common questions asked about carpet grippers and gives you some insight into making the important decisions.
What are carpet grippers? What do they do?
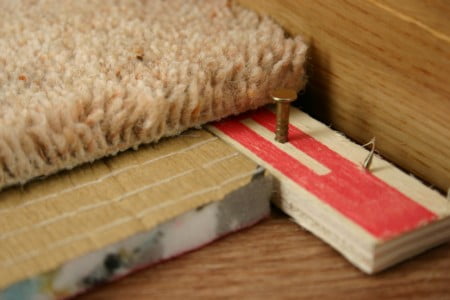
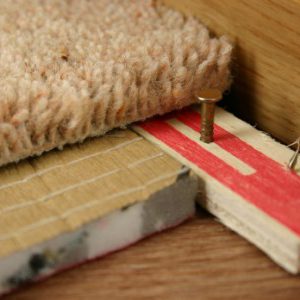
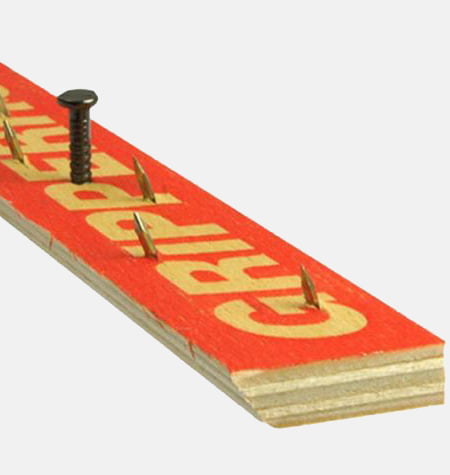
Carpet grippers are long pieces of plywood, usually 1.5m long x 2cm wide. They have sharp angled nails in them that are designed to hold the carpet in place.
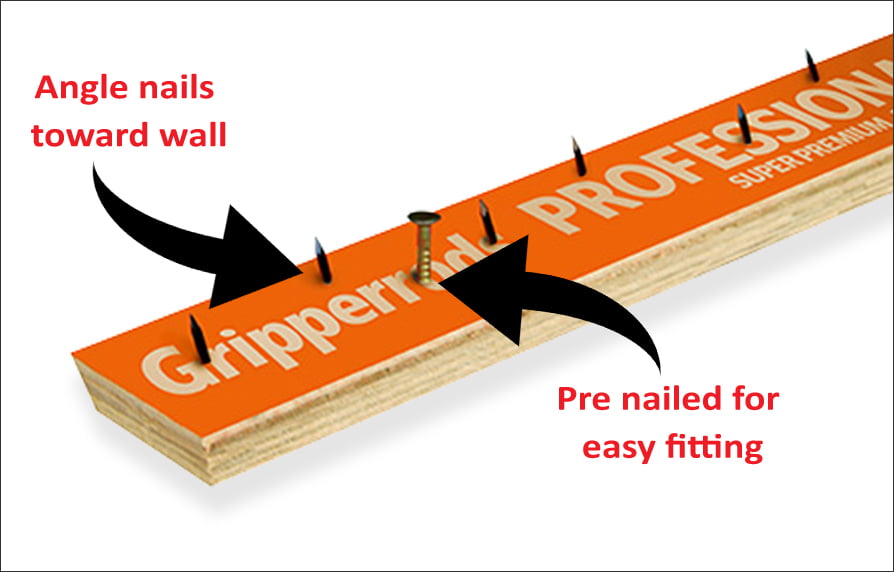
When fitted, the nails are angled towards the wall so that the carpet can be streched over them.
Gripperrods took over from the old fashioned way of fitting “ring and pin”. Gripperrods are actually the brand name developed by Interfloor a plywood section.
They are fixed around the perimeter of the room and are used to help tension the carpet and hold it in place – this stops the carpet and underlay from moving and rippling.
They often come in different pack sizes of 15m, 30m, 75m and 150m Linear meter.
Can Carpet Grippers be reused? Are they really needed?
You definitely need them if you want a nice finish to your new floor. Whether you reuse them or not is a different question.
So here’s what to take into account when making that decision.
When you take the old carpet up do an inspection on the old ones. Have a look for any nails that might be missing or if the old carpet was coming away from the wall, this could be a sign that the old grippers weren’t doing their job.
If the above is true then it’s highly recommended to use new carpet grippers when replacing an old carpet.
However, if the carpet you’re replacing isn’t that old, then you can easily leave them in place ready for the new carpet to go over the top.
It’s easy to take the carpet up without hurting the grippers, so always do that. After all reusing the ones you already have will save you a bob or two.
It’s also not recommended to transfer the rods from one room to another.
On the other hand…
If you have just laid your flooring and are looking to change it, then you should be fine to reuse the one you already have down.
Where can I buy Carpet Grippers
You can find them at most hardware stores. However, it’s often suggested that buying them online can lead to much bigger savings.
Underlay4u has a range of pack sizes that have a different total lengths. However, each individual rod is the same length
Here’s a couple of tips if you’re choosing the DIY option, and we hope it will help you do the job as it its quite easy if you are “handy”.
Buy gripper rods
Gripper rods can be attached to concrete or wood sub floors. Usually bought in packs of 15m, 30m, 60m, 75m or 150m.
How to fit Carpet gripper rods
The first thing to do is check your floor is clear of debris and there’s no pipes where you are to fit them.
In old houses water and heating pipes are often laid in notched joists just below the floor boards
So if you use a nail longer than the floor board – you could go through the pipe.
If in doubt – stick down the gripper and door plates with Gripfill instead of nails in the offending areas.
Notes on Fitting your door threshold strip.
Before fitting the carpet underlay the door thresholds strip should be sited directly under the door so when the door is shut you cannot see it.
Measure between the door frame and then cut the trim with a hack saw If the floor is wood you can simply use 10mm nails or screws.
If the floor is asphalt or concrete you can stick them down with Gripfill and leave to dry.
Fitting Gripper Rods on wood Floors
Distance from wall:
You should place the Gripper Rods approximately 10mm away from the skirting boards with the pins pointing towards the skirting boards.
- Place the carpet grippers around the outside of the room
- When you reach the end of each wall, cut the Grippers to size using a hack saw.
- The Rods are pre nailed and hammer in the nails.
How to fix gripper rods to Concrete Floors
If you’re planning to install a carpet in a room with a concrete floor, or you need to replace a stretch of carpet gripper rods, you may be wondering how to affix the gripper rod to a solid concrete floor. After all, you can’t hit a nail into a solid concrete floor! There’s actually an ingenious and inexpensive trick which utilises pieces of wooden dowel rod as a rawlplug to ensure your carpet gripper is securely affixed to your concrete floor.
You’ll need:
• A hammer drill
• A hacksaw or wood saw
• A hammer
• A masonry drill bit, ideally with a carbide tip
• A dowel rod of the same diameter as your drill bit
• A pencil
• A carpet gripper rod, cut to size
It sounds silly, but ensure the concrete floor you’re going to be drilling into is cleaned and clear of dirt and debris. You’re going to be making marks on the floor, and you don’t want to get your pencil marks confused with existing markings.
Take your gripper rod, and lay it on the floor, slightly back from the wall. Don’t worry, you’ll be installing the rod up against the wall, but you’re going to be marking out first.
Using your pencil, draw marks on the floor where the nails are positioned – in other words, exactly where you want your gripper rod installed.
When you’re happy with the position of your marks, use your drill and drill bit to drill into the concrete floor. Use a vacuum cleaner to get rid of any concrete dust. Not only is it unpleasant to breathe in, you’ll want the area clear of debris to ensure a secure installation.
With the holes drilled, insert the end of your dowel rod into a hole. Make sure it’s a secure fit, because the dowel rod is going to act as a rawlplug, giving the nails of the gripper rod something to sink into.
Use the saw to cut the rawlplug off at floor level, as if you were filling a hole. Repeat this with all the holes you’ve drilled.
You should now have holes filled with dowel rod, ready to accept the fixing nails of your gripper bar. Get your hammer, and hammer those fixing nails into the dowel rods.
Now you’ve got a secure tack strip, ready to install your carpet on to.
All you need now is some of our quality underlay, and you’re ready to add a cosy carpet to your concrete-floored room.
A bit more info on Gripper rods
What are Gripper rods?
Gripper rods took over from the old fashioned way of fitting “ring and pin” Gripperrods are a plywood section with nails that stick out like a hedgehog.
They are fixed around the perimeter of the room and are used to help tension the carpet and hold it in place – this stops the carpet and underlay from moving and rippling.
They often come in different pack sizes of 15, 30, 75 and 150 Linear meter.
Fitting Gripper Rods
The normal method of fitting on wood is to simply nail into the floor boards approx. 15mm away from the skirting (some fitters like them closer).
However, if you have a solid floor like concrete or asphalt, we always recommend a bead of Gripfill as well as nails (the nails are designed to go into concrete).
We have been told by our customers, that certain companies will charge you extra for fitting the underlay and gripper rods when you have purchased underlay from us.
Key DIY Tips
- The first thing to do is check your floor is clear of and pipes where you are to fit grippers and door threshold trims. It is not uncommon that in old houses, water and heating pipes are laid in notched joists just below the floor boards. So, if you use a nail longer than the floor board, you could go through the pipe!
- If in doubt, stick the gripper and door plates with Gripfill in the offending areas.
- Fit the door plate before fitting the carpet underlay, as the door thresholds strip should be sited directly under the door. This is so when the door is shut you, cannot see it.
- Measure between the door frame and then cut the trim with a hack saw.
- If the floor is wood you can simply use 10mm nails or screws. If the floor is asphalt or concrete, you can stick them down with Gripfill and leave to dry.