
 First question: Is it easy to fit carpet yourself?
If you take on the challenge to fit carpet yourself for the first time, it’s important you have a full understanding of the tools needed, the tasks required and any potential pitfalls.
This article gives a clear overview of the requirements when laying your own carpet.
Let’s dive right in.
Here’s some other recommended articles that will help you with the planning
How to measure carpet for stairs and landing
How to fit carpet on the stairs our simple 5-step guide
Here are the essential steps you need to take to get the job done – click the links to go straight to each section
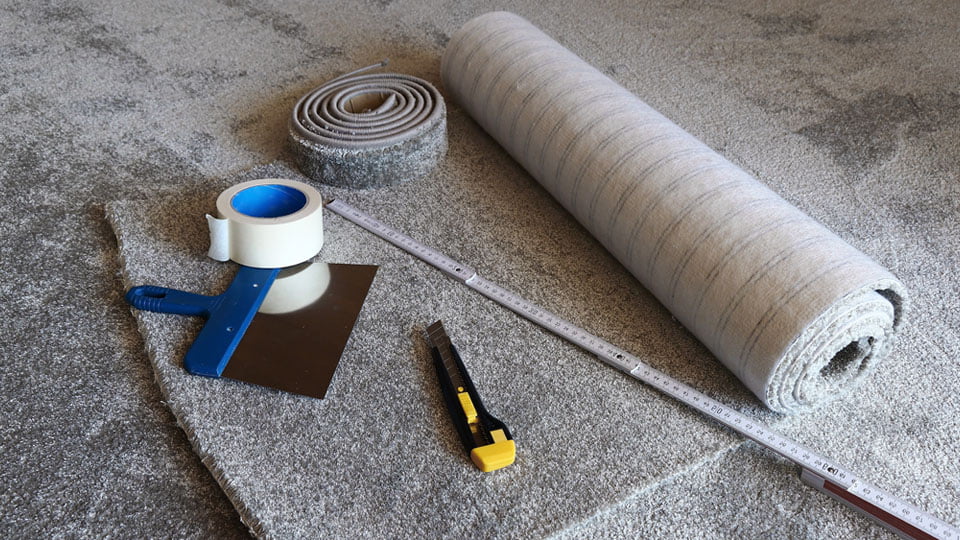
- Carpet Laying Tools Needed
- How to remove your old carpet
- how to remove your old underlay
- How to lay the grippers
- How to lay your underlay
- How to fit your carpet (on Concrete or Wood)
Carpet Laying Tools Needed
- Carpet Fitting Kit
- Knee pads
- Broom
- Heavy duty gloves
- 8mm thick timber
- Hammer
- Gripper Adhesive (if nails don’t go into concrete)
- General purpose snips
- Vacuum Cleaner
- Tape measure
- Staple Gun (or spray Adhesive
- Carpet stretcher (part of fitting kit
- Carpet Tucker (part of fitting kit)
How to Remove your old carpet
Doing this will save you a lot of back breaking work and make it much easier to dispose of your carpet.
Most often, they come in large pieces. Therefore, it can be a pain to remove.
The first thing to do is unhook the it from the old gripper rods. Then fold about a third of the carpet into the middle of the room.
At the fold, cut right down its length. That will give you your first strip.
Then, roll up the first strip and carry it to the disposal area – out of the way.
If you want to make it easier to carry, simply reduce the size of the fold e.g. only fold over a quarter of the carpet instead of a third. The shorter you fold the carpet, the lighter each piece will be. But the more repetitions you will need to do,
Now release the rest of the carpet from the grippers.
Fold over the next strip and cut again down the length of the carpet. Take that outside to the disposal area.
Repeat this process until everything has been removed from the floor.
Then remove your grippers using a hammer and chisel.
How to remove your old underlay
When fitting new floor, it’s important to replace the underlay too.
Carpet Underlay generally comes in smaller pieces and is often lighter than carpet. You can therefore remove each piece of underlay individually.
For more information on removing underlay, have a read of our article.
How to remove your carpet underlay
Once all your old stuff is removed, be sure to clean the whole area thoroughly. Remove any sticking out nails or screw heads.
Make sure you flush out the uneven floorboards or concrete defects on the subfloor surface.
Put the old underlay in the disposal area – out of the way.
How to fit the grippers
Most gripper rods come with pre-fitted nails that go into the floor and angled nails that go on top. The pre-fitted nails should fix to either a concrete or a timber floor.
Alternatively, if preferred, you could use gripper adhesive. Either of these will work well.
When laying the grippers, leave 7-8mm between the grippers and the skirting board. use a piece of 8mm thick timber and place it in between the rods and the skirting to make sure the width is the same all around the room.
Your carpet will be tucked into this gap later on.
When cutting the grippers to match the length of the wall, use general purpose snips.
There’s no golden rule in which order you do the walls when fitting gripper rods. Simply place grippers around the entire room – except in the doorway.
The doorway will need a threshold strip or metal edging bar. And the type will depend on the type of floor in the next room i.e. laminate or carpet.
How to Lay Your Underlay
Underlay absorbs shock so the carpet can prevent wear and tear. For extra comfort, go for a luxury grade underlay.
Some people ask themselves before putting underlay down:
Do I need floor lining paper when fitting carpet?
Floor lining paper will help protect the underlay and carpet from dust coming through the sub floor.
So, it’s normally used with wooden sub floors. Floor Lining Paper can also aid heat insulation. Perfect if you want to keep some of the heat in during the winter months.
If you do decide to go with it, here’s how to lay your floor lining paper.
Roll out the paper just inside the gripper rods, then stick it down with tape at the top and bottom of the sheet.
Overlap each length of paper by about 10cm then tape the joins together.
Note: you could use adhesive spray but make sure you are in a well-ventilated area.
When you’ve done all that, it’s time for the underlay.
Roll out the underlay so it butts up against the inside edge of the carpet gripper
Use a staple gun to fix the underlay to the floor. Measure 35 com from the wall, down the underlay and staple a few times across the underlay with 10cm gaps. Continue down the underlay with each line of staples being done at 35cm – Alternatively, you can use spray adhesive to fit the underlay.
Roll out the next layer of underlay and butt it up against the edge of the first length. Join the 2 pieces using 50mm (5cm) wide gaffa tape.
Keep going until the whole room is fitted with underlay inside the gripper rods.
Now for the main event.
How to fit the carpet on Concrete or Wood
When deciding which way to lay your floor, be sure to get the pattern in alignment with the main wall or focal point of the room.
Before you begin, you will need a carpet fitting kit. Always clear as much space as possible. That way you don’t have to move furniture around as you fit the carpet.
Cut the carpet to the approximate size – include allowances for final trimming
NOTE: Before making any cuts, make sure that you enable the carpet to be laid with the pile facing the same direction as the pile of any adjacent carpet in another room – otherwise the carpets may look completely different.
Firstly make sure it is positioned sufficiently to fit into any alcove and into the doorway.
Once you have rested in the correct positions and are happy with the main alignment of it, go over the area with your feet. Shuffle across it with your feet to push any ripples or ridges out.
You should now have minimum of 10cm excess along one wall and a larger excess against the other adjacent walls. You need to reduce the excess to 10cm right around the room. Here’s how.
Push the carpet into each corner. cut the excess vertically from the top in the corner so it’s more flexible and easier to push the carpet into the floor gripper – don’t make the vertical cut too long as you will end up having a gap in the corner of the room.
Make the cut in stages if necessary and ease the carpet into the corner between the cuts.
Fold the carpet over on the side where there is more than 10cm excess and cut the excess down to 100mm (10cm) ready for hooking. Make sure you don’t cut through the carpet underneath that’s already laid on the floor.
Now for the stretch hooking…
Starting in the corner that is diagonally opposite the doorway. Use the carpet stretcher to hook the carpet onto the gripper for approximately 1 meter in each direction, from the corner.
When hooking, apply pressure down on the carpet stretcher and kick the padded end with your knee to force the carpet forward. Then tuck in the edge with a carpet chisel.
Next, down the longest side of the room, in the opposite corner, stretch it into the wall and hook it onto the gripper for approximately 1 metre
Once you have 2 corners done, work your way down the longest wall, hooking it onto to the grippers between the 2 corners.
Next move to the shorter side and stretch the carpet into the grippers 1 metre either side of the corner, again opposite the corner you started in.
Once hooked in the corner, work along the remainder of the shorter side to hook the carpet onto the grippers.
Great, that should be 2 full lengths of the room done – one short and one long.
Now stretch and hook the it onto the grippers, 1 meter in each direction, from the corner that is diagonally opposite the one you started in.
Finally, hook the carpet to the grippers along the remaining longest side first and then the remaining short side.
Great, that’s all sides sorted.
Once finished, the carpet should be fully hooked on to the grippers and free from ripples.
If there are ripples, unhook it and re-stretch then re-hook it back onto the grippers
Wonderful! You should now have your carpet fitted with an excess of 10mm around the outside of the grippers. Here’s how to sort that.
Trimming the final excess.
To trim the last bit, fold the carpet back on itself so it’s tight against the skirting board. Cut the carpet backing approximately 8mm from the face of the skirting board. Again, be careful not to cut the parts that are already laid.
Once cut, use a carpet tucker to push the carpet into the gap between the skirting board and the gripper
Repeat the process until all the trimming and tucking, except the doorway is complete.
In the doorway, trim the carpet so that it’s slightly overlapping the threshold bar and ends just before the middle of the threshold bar
Once cut, use a tucker to tuck the carpet into the threshold
And that’s your brand spanking new floor laid!
Any comments or questions? please let us know in the form below.